
Default
Cancel
Network Graphing with Python
Network graphs are a nice way to visualize relationships and investigate data. Many threat intelligence platforms provide built-in network graphing features, including Maltego, OpenCTI and MISP. Maltego, for example, claims to have over 2,000 government customers.

This blog highlights how to create basic network graphs using Python.
Graphing Libraries
There are a lot of different options for graphing libraries - a few that i’ve tested out are:
- Vis.js
- Cytoscape.js
- NetworkX (Python)
- PyVis (wrapper around Vis.js, uses NetworkX)
- Neo4j Python Driver (graph database)
My personal favorite is using NetworkX with PyVis or just using Vis.js directly.
Graphing with Python
One of the nice things about PyViz and NetworkX is that you can engage with the graph by moving around nodes or changing the physics / graph model . It also supports Jupyter Notebook or just saving graphs to HTML:
net.show("network_graph.html")- Display in jupyter notebook
net.write_html("network_graph.html")- Save as HTML
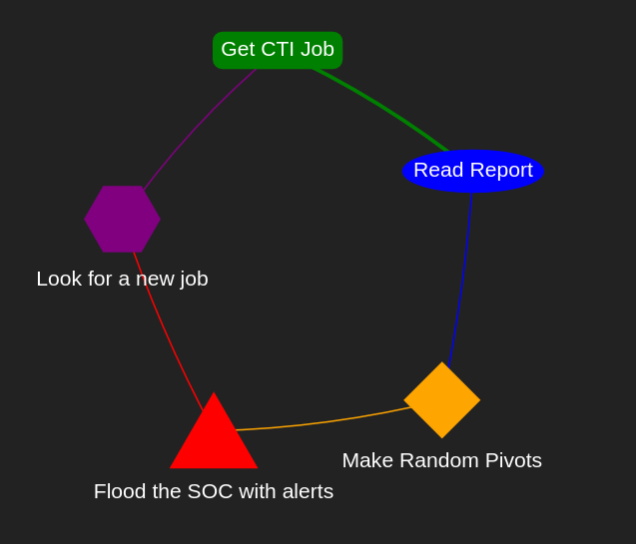
Here’s a small demonstration with directional edges, unique node colors and shapes.
1
2
3
4
5
6
7
8
9
10
11
12
13
14
15
16
17
18
19
20
21
22
23
24
25
26
27
28
29
30
31
32
33
34
35
36
37
38
39
40
41
42
43
44
45
46
47
48
import networkx as nx
from pyvis.network import Network

# Create a directed NetworkX graph
G = nx.DiGraph()  # to DiGraph for directed edges, nx.Graph() for non-directional

# Define nodes with categories
nodes = {
    "Get CTI Job": {"color": "green", "shape": "box"},
    "Read Report": {"color": "blue", "shape": "ellipse"},
    "Make Random Pivots": {"color": "orange", "shape": "diamond"},
    "Flood the SOC with alerts": {"color": "red", "shape": "triangle"},
    "Look for a new job": {"color": "purple", "shape": "hexagon"},
}

# Add nodes to the graph
for node, attrs in nodes.items():
    G.add_node(node, **attrs)

# Define edges (relationships) with direction
edges = [
    ("Get CTI Job", "Read Report"),
    ("Read Report", "Make Random Pivots"),
    ("Make Random Pivots", "Flood the SOC with alerts"),
    ("Flood the SOC with alerts", "Look for a new job"),
    ("Look for a new job", "Get CTI Job"),  # Looping back to starting point
]

# Add edges with arrows enabled
G.add_edges_from(edges)

# Create a PyVis network
net = Network(height="500px", width="500px", bgcolor="#222222", font_color="white", directed=True)

# Add nodes with styles
for node, data in G.nodes(data=True):
    net.add_node(node, label=node, color=data["color"], shape=data["shape"])

# Add edges
for edge in edges:
    net.add_edge(*edge, arrowStrikethrough=False)  # <-- Enables arrows

# Set physics for better layout
net.force_atlas_2based()

# Save file
html_file = "network_graph.html"
net.write_html(html_file)
Icon Customization
PyVis uses Vis.JS which is why the saved graph is a HTML file. We can use this to our advantage to improve the graph style. FontAwesome is a popular web library with a lot of free and classic icons:
To use FontAwesome Icons in Vis.JS you need to set the Node icon face to the unicode character version of the icon, such as \uf015
{"icon": {"face": "FontAwesome", "code": \uf015, "color": #FFFFFF}}
This unicode key can be found in the top right of a icons information page on the FontAwesomes website.
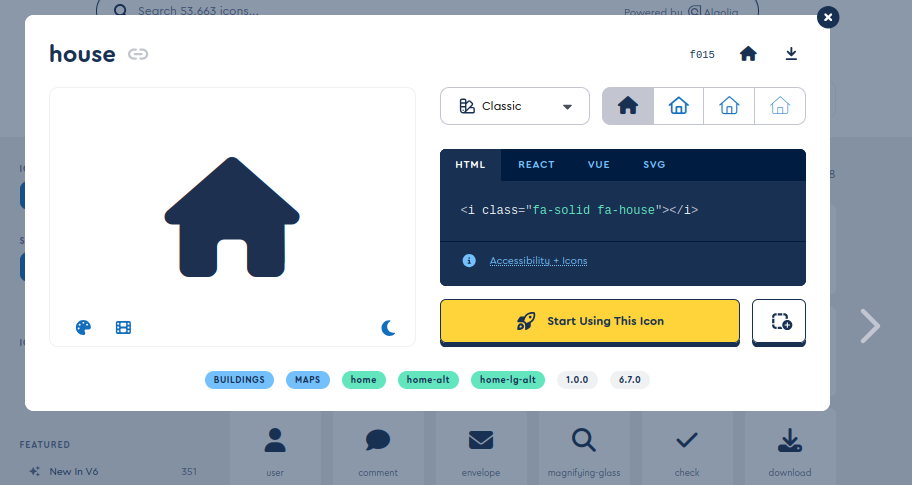
The key to getting this to work is handling the unicode characters properly and injecting the FontAwesome library into the saved html graph. For the FontAwesome library I personally use the CloudFlare cdnjs link, but you could also download the library yourself.
1
2
3
4
5
6
7
8
9
10
11
12
13
14
15
16
17
18
19
20
21
22
23
24
25
26
27
28
29
30
31
32
33
34
35
36
37
38
39
40
41
42
43
44
45
46
47
48
49
50
51
52
53
54
55
56
57
58
59
60
61
import networkx as nx
from pyvis.network import Network
# Create a directed NetworkX graph
G = nx.DiGraph() # Use DiGraph for directed edges
# Define nodes with FontAwesome icons and colored icons
nodes = {
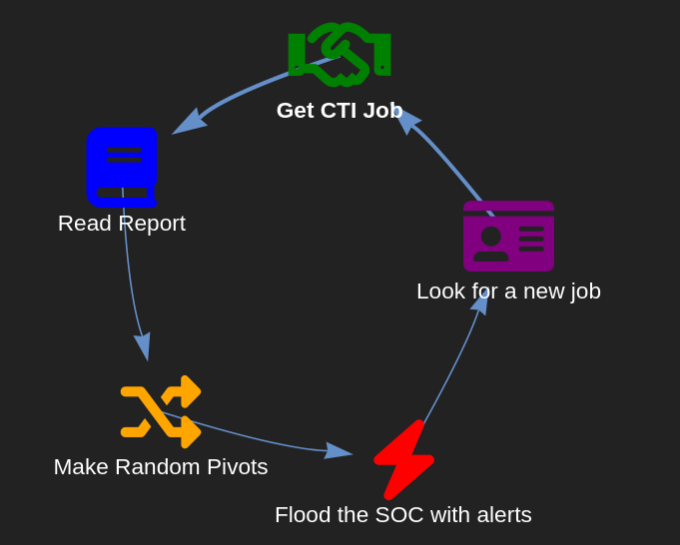
"Get CTI Job": {"color": "green", "shape": "icon", "icon": {"face": "FontAwesome", "code": "\uf2b5", "color": "green"}}, # User icon
"Read Report": {"color": "blue", "shape": "icon", "icon": {"face": "FontAwesome", "code": "\uf02d", "color": "blue"}}, # Book icon
"Make Random Pivots": {"color": "orange", "shape": "icon", "icon": {"face": "FontAwesome", "code": "\uf074", "color": "orange"}}, # Shuffle icon
"Flood the SOC with alerts": {"color": "red", "shape": "icon", "icon": {"face": "FontAwesome", "code": "\uf0e7", "color": "red"}}, # Bolt (alert) icon
"Look for a new job": {"color": "purple", "shape": "icon", "icon": {"face": "FontAwesome", "code": "\uf2c2", "color": "purple"}}, # Suitcase icon
}
# Add nodes to the graph
for node, attrs in nodes.items():
G.add_node(node, **attrs)
# Define edges with direction
edges = [
("Get CTI Job", "Read Report"),
("Read Report", "Make Random Pivots"),
("Make Random Pivots", "Flood the SOC with alerts"),
("Flood the SOC with alerts", "Look for a new job"),
("Look for a new job", "Get CTI Job"), # Looping back to starting point
]
# Add edges
G.add_edges_from(edges)
# Create a PyVis network with directed edges
net = Network(height="500px", width="500px", bgcolor="#222222", font_color="white", directed=True)
# Add nodes with FontAwesome icons and colors
for node, data in G.nodes(data=True):
net.add_node(node, label=node, shape=data["shape"], icon=data["icon"])
# Add edges with arrows
for edge in edges:
net.add_edge(*edge, arrowStrikethrough=False)
# Set physics for better layout
net.force_atlas_2based()
# Save the graph
html_file = "network_graph.html"
net.write_html(html_file)
# Inject FontAwesome library into the HTML file
with open(html_file, "r", encoding="utf-8") as f:
html_content = f.read()
# Add FontAwesome to the header
fontawesome_link = '<link rel="stylesheet" href="https://cdnjs.cloudflare.com/ajax/libs/font-awesome/6.0.0/css/all.min.css">'
html_content = html_content.replace("</head>", f"{fontawesome_link}</head>")
# Write the updated HTML
with open(html_file, "w", encoding="utf-8") as f:
f.write(html_content)
Graph Creation from CSV
There’s certainly a lot of fun possibilities with data from API services, but lets take a look at graphing data from a CSV file. To generate the CSV lets use a spreadsheet tool like Excel to document the nodes and generate the CSV. The columns i’m using are:
fromfrom_iconfrom_colorto
Every relationship has it’s own row in the spreadsheet and the script prevents multiple nodes being created for unique from values.
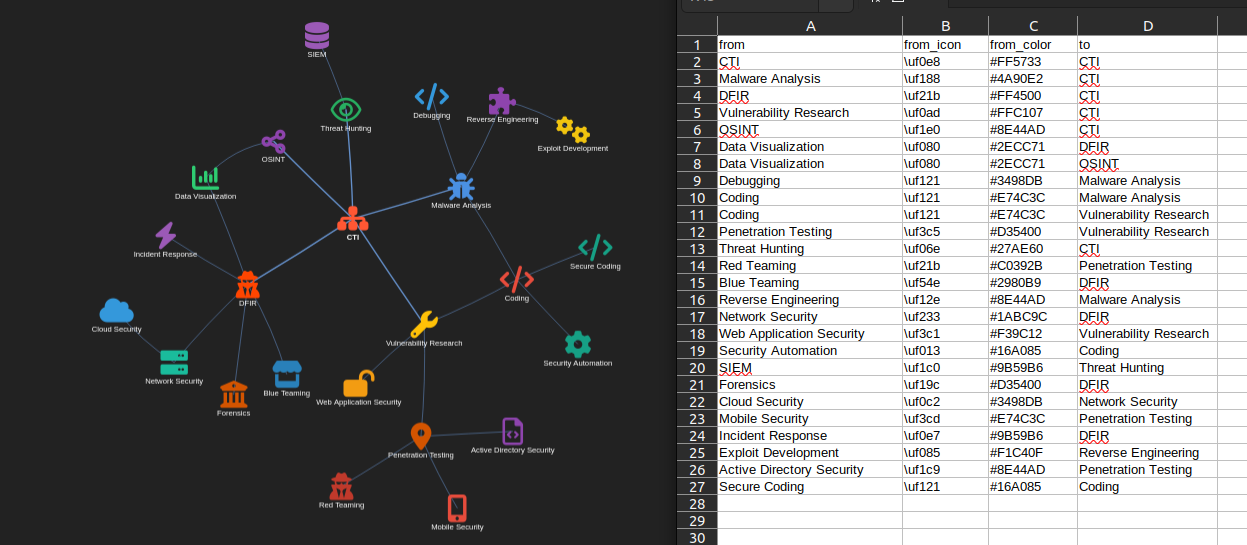
A more robust script would probably store relationships as separate columns and ensure each node is represented by a single unique row, but this is mostly a proof of concept.
Here’s the code for my csv-to-graph.py script (also published as a Github Gist)
1
2
3
4
5
6
7
8
9
10
11
12
13
14
15
16
17
18
19
20
21
22
23
24
25
26
27
28
29
30
31
32
33
34
35
36
37
38
39
40
41
42
43
44
45
46
47
48
49
50
51
52
53
54
55
56
57
58
59
60
61
62
63
64
65
66
67
68
69
70
import pandas as pd
from pyvis.network import Network

# Read the CSV file
csv_file = "demo.csv"  # Replace with your actual file path
data = pd.read_csv(csv_file)

# Ensure 'from' and 'to' columns are strings and handle missing values
data['from'] = data['from'].fillna('').astype(str).str.strip()
data['to'] = data['to'].fillna('').astype(str).str.strip()

# Initialize the PyVis network
graph = Network(height='750px', width='100%', bgcolor='#222222', font_color='white')

# Pre-process nodes to collect icon and color information
node_icons = {}
for index, row in data.iterrows():
    from_node = row['from']

    # Skip empty nodes
    if not from_node:
        continue

    from_icon = row.get('from_icon', None)
    from_color = row.get('from_color', "#F5A623")  # Default color if not set

    # Process FontAwesome icons
    if pd.notna(from_icon) and from_icon.startswith("\\u"):
        try:
            unicode_icon = chr(int(from_icon.replace("\\u", "0x"), 16))
            node_icons[from_node] = {"icon": {"face": "FontAwesome", "code": unicode_icon, "color": from_color}}
        except ValueError:
            node_icons[from_node] = {"icon": None}
    else:
        node_icons[from_node] = {"icon": None}

# Collect all unique non-empty nodes
all_nodes = set(data['from']).union(set(data['to'])) - {''}  # Remove empty strings

# Add nodes to the graph
for node in all_nodes:
    if node in node_icons:
        icon_settings = node_icons[node]['icon']
        graph.add_node(node, label=node, title=node, shape='icon' if icon_settings else 'dot', icon=icon_settings)
    else:
        graph.add_node(node, label=node, title=node, shape='dot')

# Iterate through the DataFrame and add edges (ignore empty and self-looping edges)
for index, row in data.iterrows():
    if row['from'] and row['to'] and row['from'] != row['to']:  # Avoid self-loops
        graph.add_edge(row['from'], row['to'])

# Customize the visualization
graph.force_atlas_2based()

# Save and modify the HTML file
html_file = "graph.html"
graph.write_html(html_file)

# Inject FontAwesome library into the HTML
with open(html_file, "r", encoding="utf-8") as f:
    html_content = f.read()

fontawesome_link = '<link rel="stylesheet" href="https://cdnjs.cloudflare.com/ajax/libs/font-awesome/6.0.0/css/all.min.css">'
html_content = html_content.replace("</head>", f"{fontawesome_link}</head>")

with open(html_file, "w", encoding="utf-8") as f:
    f.write(html_content)

print(f"Report saved to {html_file}")
There’s still plenty of graphing features to explore, like layouts and dynamic interactions, but that wraps up this introduction to network graphing!